1. Eclipse vs. IntelliJ IDEA vs. Netbeans. Installation.
2. Eclipse vs. IntelliJ IDEA vs. Netbeans. Creating and running Scala project with Eclipse.
3. Eclipse vs. IntelliJ IDEA vs. Netbeans. Creating and running Scala project with IntelliJ IDEA.
4. Eclipse vs. IntelliJ IDEA vs. Netbeans. Creating and running Scala project with Netbeans.
5. A novice Scala programmer: Eclipse vs. IntelliJ IDEA vs. Netbeans.
In this final post here's a short summary for Eclipse vs. IntelliJ IDEA vs. Netbeans:
Eclipse plugin for Scala.
Positive: Works. Is free. Customizable environment. Has predefined templates for Scala Project, Scala object, Scala Class, Scala file. Good debugger.
Negative: A very little documentation. Does not appear to be actively developed. There are news groups and Artima forum, but there is not too much live in there. No hotline support. Does not automatically create a project folder, so you need to remember to create it. Inconvenient manual process of setting run-time configuration and running. You need to manually switch from "Debug perspective" to "Scala perspective" after you finished debugging (although it's just one mouse click.)
Intellij IDEA plugin for Scala.
Positive: Works. Customizable environment. Has predefined templates for Scala Project and file. Good debugger. Being developed very actively. Excellent, friendly hotline support on Scala plugin forum. Sokoban plugin works fine with "Diana EAP" beta of Intellij IDEA
Negative: Intellij IDEA is quite expensive, unless you qualify for a free version as established Open Source developer. "Diana EAP" beta of Intellij IDEA is very fragile. Installing any plugin could ruin it. But Scala plugin does not work under stable editions of Intellij IDEA. No predefined templates for Scala object, Scala Class, although user can create them. Almost no Scala plugin documentation. Does not automatically create a project folder, so you need to remember to create it. Inconvenient manual process of setting run-time configuration and running.
Netbeans plugin for Scala.
Positive: Works. Is free. Very easy to use, really automated. Customizable environment. Has predefined templates for everything. Being developed very actively.Good debugger.
Negative: Almost no Scala plugin documentation, but it's so easy to use, I didn't have any problem. I didn't find any live people to discuss Netbeans Scala plugin or Scala itself, although you can post bugs.
I would probably choose Netbeans by Scala development, but there is one thing which might over weigh its maturity and ease of use: an excellent user-friendly and responsive Scala Plugin forum on IntelliJ IDEA. It feels like a team where you can get immediate help not only with installation issues, but also discuss advanced Scala features and patterns.
Thursday, July 31, 2008
A novice Scala programmer: Eclipse vs. IntelliJ IDEA vs. Netbeans.
A novice Scala programmer: Eclipse vs. IntelliJ IDEA vs. Netbeans. Creating and running Scala project with Netbeans.
In a first post in this Scala mini series I described my experience with installation of Eclipse, IntelliJ IDEA, and Netbeans applications and installation of Scala plugins in those environments.
In a second post I explained how would I create, set up, run and debug Scala project in Eclipse.
In a third post I explained how would I create, set up, run and debug Scala project using IntelliJ IDEA.
Now, let's now follow the process of creating, configuring, running, and debugging a simple Scala project with Netbeans. As a test project I will use the same "Rational" class defined in chapter three of the wonderful Programming in Scala book written by Martin Odersky, Lex Spoon, and Bill Venners.
VII. A process of creation Scala application with Netbeans plugin is not described anywhere (I haven't found it; this page explains how to setup environment), but Netbeans is highly automated and interface is really intuitive. I didn't have any problem with it.
1. Start Netbeans. Use File | New Project menu to start process. Choose "Scala Application", then, on the following screen set the name of Project, Project Location, Main Class Name (as PackageName.ObjectName) and hit Finish. That's it! Everything is automatically created; nice folder structure is created too. There are templates for adding more classes / objects. (Note, that Netbeans does not automatically create a project folder, as opposed to both Eclipse and IntelliJ IDEA. You don't need to do it manually.) You don't need to select application type as Java Module. You don't need to manually point to a right Scala SDK installation. Much easier to use, than Eclipse or IntelliJ IDEA.


2. Add necessary classes/objects. Save everything.


VIII. There is no need for complex setup run-time environment. It works fine right away and by default in Netbeans.
1. Click on a Run or Debug button and enjoy. Breakpoints are set by clicking on a gray area to the left from code.
Wednesday, July 30, 2008
A novice Scala programmer: Eclipse vs. IntelliJ IDEA vs. Netbeans. Creating and running Scala project with IntelliJ IDEA.
In a first post in this Scala mini series I described my experience with installation of Eclipse, IntelliJ IDEA, and Netbeans applications and installation of Scala plugins in those environments.
In a second post I explained how would I create, set up, run and debug Scala project in Eclipse.
Now, let's now follow the process of creating, configuring, running, and debugging a simple Scala project with IntelliJ IDEA. As a test project I will use the same "Rational" class defined in chapter three of the wonderful Programming in Scala book written by Martin Odersky, Lex Spoon, and Bill Venners.
V. A process of creation Scala application with Intellij IDEA plugin is slightly touched on IntelliJ IDEA Scala Plugin page and in corresponding forum.
1. Start IntelliJ IDEA. Use File | New | Project menu and create chp6Rational Scala project in an appropriate folder. Choose Project Name, Project File Location. Note, that IntelliJ IDEA does not automatically create a project folder, so you would need to create chp6Rational (you name it) folder in your Scala work folder. Make sure you selected application type as Java Module. On a next screen check "Create Source Directory" and name it as "src". On a yet next screen, make sure that "Scala" check box is checked and a proper Scala SDK appears in a box to the right. Finish this long process.


2. Expand the "chp6Rational" project tree, select "src"folder, right click and choose New | Package. Name it "rational".
3. Expand the project tree, select "rational" package, right-click and choose New | Scala File. There are no predefined templates for Scala Object or Scala Class creation (you can add your own). Add an appropriate code from "Programming in Scala".
4. Save everything.
VI. Here's how to set, compile, run or debug Scala application with IntelliJ IDEA.
1. Click on a small arrow-down button on a toolbar under Run menu to set up run configurations or use Run | Add new configuration / Edit configuration menu. Set application name and main Class name (PackageName.MainObjectName format). Hit "Run".
2. What really drives me crazy is the fact, you'll need to at least two mouse click every time you need to run your Scala application. Although system already remember settings from previous run, it asks you again.

3. Debugger works nicely with Scala application. You can set breakpoints by double-clicking white area to the left of your code, execute code line-by-line, see values of variables.
Hit debug button (right arrow) on a toolbar, confirm app settings and debug. You don't need to manually switch from "Debug perspective" to "Scala perspective" after you finish debugging, as you need with Eclipse.
A novice Scala programmer: Eclipse vs. IntelliJ IDEA vs. Netbeans. Creating and running Scala project with Eclipse.
III. A process of creation Scala application with Eclipse plugin is roughly described on Scala Plugin for Eclipse page.
1. Start Eclipse. Use File New Scala Project menu and create chp6Rational Scala project in an appropriate folder. Eclipse automatically create a project folder with a name of your project, so you would just need to specify chp6Rational as a project name. When Scala project is created, Eclipse automatically creates "src" sub folder.
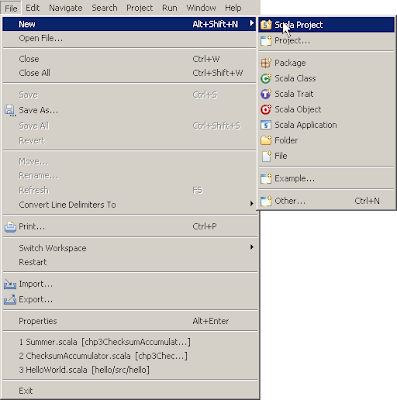
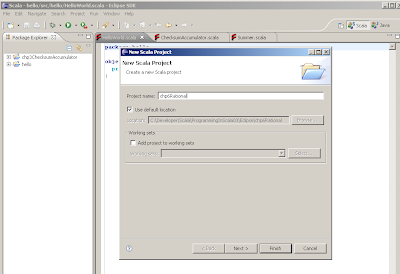
2. Expand the "chp6Rational" project tree in "Package Explorer", select "src"folder, right click and choose New Package. Name it "rational".
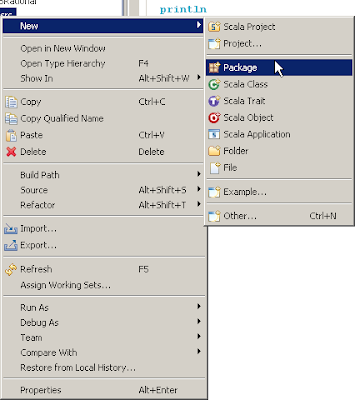
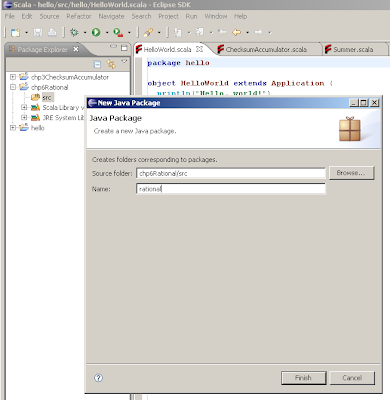
3. Expand the project tree, select "rational" package, right-click and choose New Scala Class. name it "Rational". Add an appropriate code from "Programming in Scala".
Do it again, this time creating new "MyApp" Scala Object and add def main(args: Array[String]) { } code.
4. Save everything.
IV. Here's how to set, compile, run or debug Scala application with Eclipse.
1. Select "chp6Rational" project in Package Explorer, click Run Run Configurations..., double-click or right-click on Scala Application to create a new one. Name your application, type chp6Rational as Project name, type fully qualified main class name as PackageName.ObjectWithMainMethodName (rational.MyApp in my case).
2. Hit "Run" button to compile and run your Scala application. What really drives me crazy is the fact, you'll need to repeat steps 1-2 (except naming application, project, and main class) every time you want to run your Scala application. "Run" button on Eclipse toolbar doesn't work correctly with Scala.
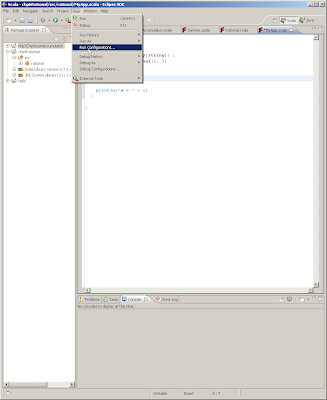
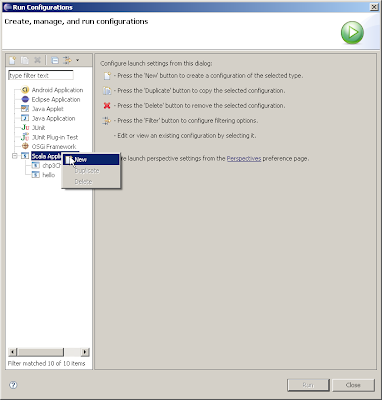
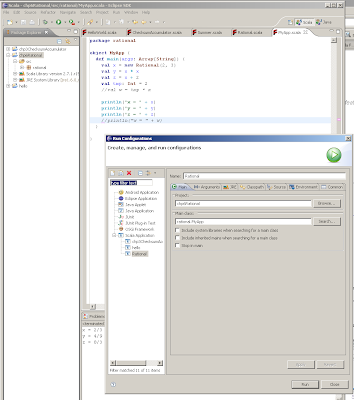
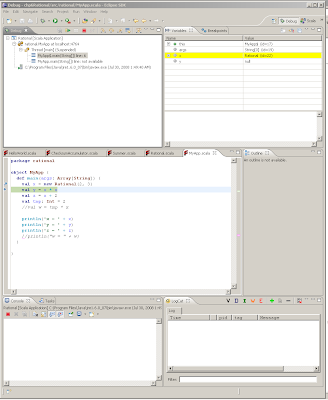
3. Debugger works nicely with Scala application. You can set breakpoints by double-clicking gray area to the left of your code, execute code line-by-line, see values of variables.
Repeat steps 1-2 above, but instead of Run Run Configurations... start from Run Debug Configurations... After you finish debugging in Eclipse, close Debug Perspective by clicking on "Scala" perspective in the top right corner.
Friday, July 25, 2008
Sokoban
Sokoban, according to Wikipedia, is a "transport puzzle in which the player pushes boxes around a maze, viewed from above, and tries to put them in designated locations". It was a first and only computer game I ever enjoyed (except sort period of Prince of Persia :) ).
It's quite a complicated scientific problem to solve. I re-discovered it as a plugin for IntelliJ IDEA development environment.
Thursday, July 24, 2008
A novice Scala programmer: Eclipse vs. IntelliJ IDEA vs. Netbeans. Installation.
1. Eclipse vs. IntelliJ IDEA vs. Netbeans. Installation.
2. Eclipse vs. IntelliJ IDEA vs. Netbeans. Creating and running Scala project with Eclipse.
3. Eclipse vs. IntelliJ IDEA vs. Netbeans. Creating and running Scala project with IntelliJ IDEA.
4. Eclipse vs. IntelliJ IDEA vs. Netbeans. Creating and running Scala project with Netbeans.
5. A novice Scala programmer: Eclipse vs. IntelliJ IDEA vs. Netbeans.
This is a first article in a mini-series.
The Scala Programming Language is a beautiful modern statically typed general usage language, combining object-oriented and functional programming approaches. It was originally developed for Java platform, but also exists for .NET. "During a meeting in the Community Corner (java.net booth) with James Gosling, a participant asked an interesting question: "Which Programming Language would you use *now* on top of JVM, except Java?". The answer was surprisingly fast and very clear: - Scala."
I. Which Integrated Development Environments support Scala?
Until recent time, it was impossible to find an acceptable IDE for Scala development. How could you expect any substantial usage of a language, if you almost have to write code in Notepad and then compile it from command line?
Fortunately, it looks like that things are changing. Right now there are [at least] three different development environments which has Scala plug-ins available: Eclipse, IntelliJ IDEA, and Netbeans. Unfortunately, all of them are for Java's breed of Scala, I didn't find any IDE supporting Scala for .NET.
Eclipse and Netbeans are free; to obtain a free copy of IntelliJ IDEA, one have to prove that he is an established Open Source developer, otherwise it's relatively expensive. On all three platforms you would need to install a [beta] plugin to be able to work with Scala. (Scala SDK itself is totally free.)
II. Installation.
It's easy to install Scala and to configure your machine:
1. Make sure you have a latest Java Runtime Environment or, better, Java Development Kit; see glossary for details). (I never tried to run Scala's .NET compiler, although I'm ASP.NET developer.)
2. Download and install latest Scala. Java installer works just fine. Read Getting Started with Scala and set environment variables. (If you are new to Scala, Programming in Scala book is a must.)
Here's how to install IDEs and corresponding plug-ins:
3. Eclipse.
Download and install latest stable release. I chose "Eclipse Classic".
Download and install New Scala Plugin beta (do not use "stable", it's very primitive and is not being maintained any more.)
Note, that you don't need to download plugin using browser. Instead start Eclipse, open Help Software Updates Available Software Add Site and use http://www.scala-lang.org/downloads/distrib/files/nightly/scala.update/ as a remote update site.
4. IntelliJ IDEA
Currently, to run Scala plugin you have to install a latest Diana EAP (beta) version of IntelliJ IDEA. Stable version of IntelliJ IDEA will not work with Scala plugin.
Start IntelliJ IDEA and go to File Settings IDE Settings Plugins Available. Select Scala and Sokoban, right-click and select "Download and Install". Do not select any other plugin, because they are incompatible with Diana EAP version of IntelliJ IDEA. Click OK.
5. Netbeans.
Currently, to run Scala plugin you have to install a latest nightly build of Netbeans. I installed a pack marked as All. A complete instruction of installing Netbeans and Scala beta plugin is written by plugin author.
Monday, July 14, 2008
A generic ListCollection class. Take 2.
I blogged recently about using public Collection instead of public List. The Visual Studio Code Analysis Team explained in their blog how to re-use List methods in classes derived from Collection<T> generic class. As you can see, their approach requires your class constructor to call base constructor of List<T>. To make developer's life easier, I proposed to make a generic ListCollection<T> class with such a constructor and inherit custom collection classes from it.
Then I read The Missing .NET #2: Collection<T> AddRange() article by Jason Kemp. He implemented "missing" methods of Collection<T> as extension methods. I added the same methods to my ListCollection<T> class. Because a default constructor of ListCollection<T> class guarantees that its protected Items property actually contains a List<T>, it is easier to implement "missing" methods; you just call corresponding methods of List<T>:
An update: I added a "conversion" constructor Collection<T>(IList
// A default constructorpublic ListCollection() : base(new List<T>()) { }
// A "converter" constructor, which does not copy the list passed in. // See http://msdn.microsoft.com/en-us/library/ms132401.aspxpublic ListCollection(IList<T> list) : base(list) { }
public ListCollection<T> FindAll(Predicate<T> match) {
return new ListCollection<T>(((List<T>)Items).FindAll(match));
}
Friday, July 11, 2008
Tuesday, July 08, 2008
A generic ChangeType method which works with nullable conversion types
I slightly modified Peter Johnson's code which allows to use Convert.ChangeType with nullable conversion types.
To compare Conversion using TypeConverter vs. Convert.ChangeType / IConvertible see https://docs.microsoft.com/en-us/dotnet/standard/base-types/type-conversion#the-typeconverter-class
public static class ConversionExtensions
{
public static T ChangeType
{
Type conversionType = typeof(T);
if (conversionType.IsGenericType && conversionType.GetGenericTypeDefinition() == typeof(Nullable<>))
{
if (value == null)
{
return default(T);
}
conversionType = Nullable.GetUnderlyingType(conversionType);
if (conversionType == null) throw new Exception("ConversionExtensions ChangeType
}
return (T) Convert.ChangeType(value, conversionType);
}
}
}